1.2 Cloud-based workflow (via GitHub)
The simplest way to generate HTML course materials makes use of GitHub to perform the conversion in the cloud, which means that you will not need to install anything on your computer. All you need to do is upload your LaTeX source code to a (private) GitHub repository; the conversion to HTML is then done automatically.
Additionally, if you use Overleaf, you can set it up to connect to GitHub. After the initial setup, there will be no need to interact directly with GitHub. Here, we explain this particular workflow11 1 You should also follow this section if you don’t plan to use Overleaf, but still want to use the cloud-based conversion to HTML. The instructions will indicate where to deviate from these steps.. The main steps are as follows:
-
Step 1:
Make a copy of the course notes template from GitHub.
-
Step 2:
Create an Overleaf project, link it to your GitHub repository.
-
Step 3:
Write your notes in Overleaf, and sync with GitHub.
-
Step 4:
Download the generated HTML version of your notes from GitHub as a SCORM package, and upload it directly to Learn.
-
Step 5 (optional):
Easily publish your notes as a public website using GitHub Pages.
In addition to the written instructions below, a video recording of a demo session showing the cloud-based workflow can be found on Media Hopper.
1.2.1 Step 1: Make a copy of the course notes template on GitHub
Create a GitHub account and join the UoE School of Mathematics organization
If you already have a GitHub account, then please email the Learning Technology Team lt@maths.ed.ac.uk giving your GitHub username, and ask to be added to the UoE School of Mathematics GitHub organization.
If you do not have a GitHub account, then please email the Learning Technology Team lt@maths.ed.ac.uk and ask for an invitation to the UoE School of Mathematics GitHub organization. You will receive an email from GitHub with a link to create an account and join the SoM organization. Please note that the email may not render properly in your mail client – the link may appear as an empty box but this is the invitation link!
Make a new GitHub repository for your notes using the SoM template
Sign in to your GitHub account, and go to the blank template repository. Then, click the “Use this template” button at the top right of the page. This will create a new repository for you containing the template files.
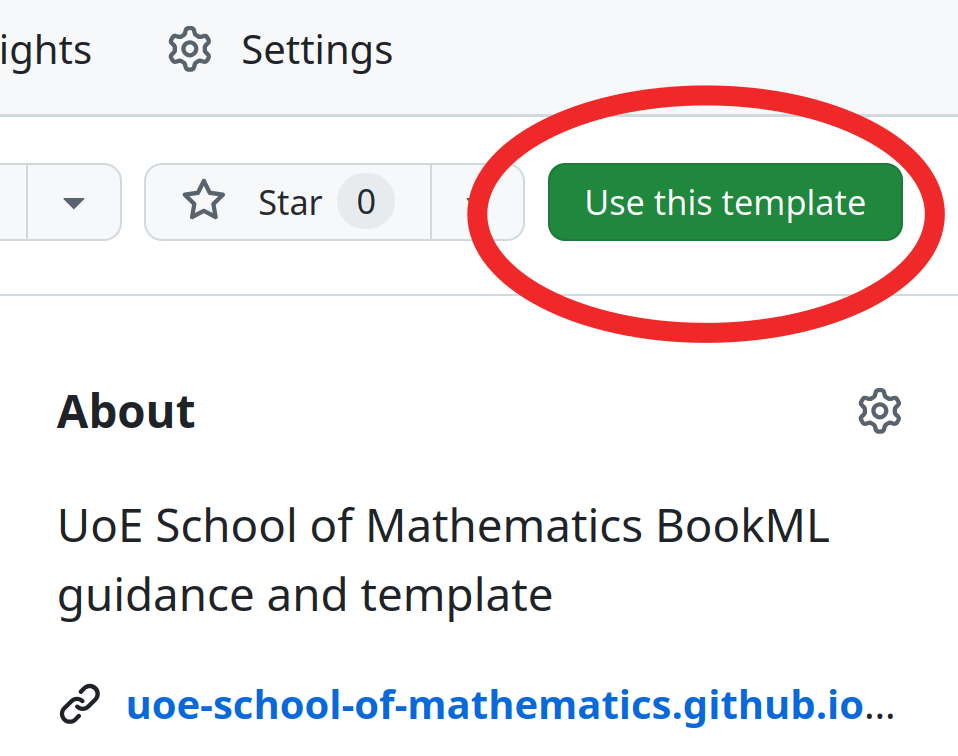
The “Create a new repository” page has some options:
-
•
Keep “Include all branches” unticked.
-
•
Change “Owner” to “UoE-School-of-Mathematics”. This will ensure that your notes are stored in a private repository on GitHub in the UoE School of Mathematics organization22 2 If you prefer the repository to be owned by your own GitHub account instead, one important difference is that the GitHub Actions minutes needed to perform the HTML conversion in the cloud will be taken from your own GitHub account’s quota. The SoM organization has a larger allowance; this is why we encourage you to use it..
-
•
Choose an appropriate repository name; we recommend that you choose your course abbreviation (e.g. FAC, IMU, IDS, FPM…), or include it in the name.
-
•
Make sure “Visibility” is “Private”.
Finally, click “Create repository” and wait at least 3 minutes before moving on. GitHub needs some time to initialise the project.
Not using Overleaf?
At this stage, you will have your own copy of the SoM template, as your own repository on GitHub. Steps 2 and 3 below use Overleaf, which makes things easier if you’re not familiar with GitHub. However, it’s also possible to not use Overleaf at all if you prefer to work locally:
-
•
If you are comfortable working with git, you can clone your new repository, and push your changes to GitHub to update the HTML version.
-
•
If not, you can also download the files from GitHub (following these instructions), extract the .zip, write your notes in that folder, and re-upload any .tex files you have changed directly to GitHub (following these instructions) every time you want to update the HTML version.
In any case, if you do this, you can skip directly to section 1.2.4.
1.2.2 Step 2: Create an Overleaf project linked to your GitHub repository
Link your Overleaf account to your GitHub account
Visit your Overleaf account settings. Under Project Synchronisation, click Link next to GitHub Sync. Follow the prompts to link Overleaf and GitHub.
Make an Overleaf project from your GitHub repository
At this stage, you should have a GitHub repository created from the SoM template. In Overleaf, create a new project, ensuring you choose Import from GitHub. Then, choose Import to Overleaf for the repository you created previously.
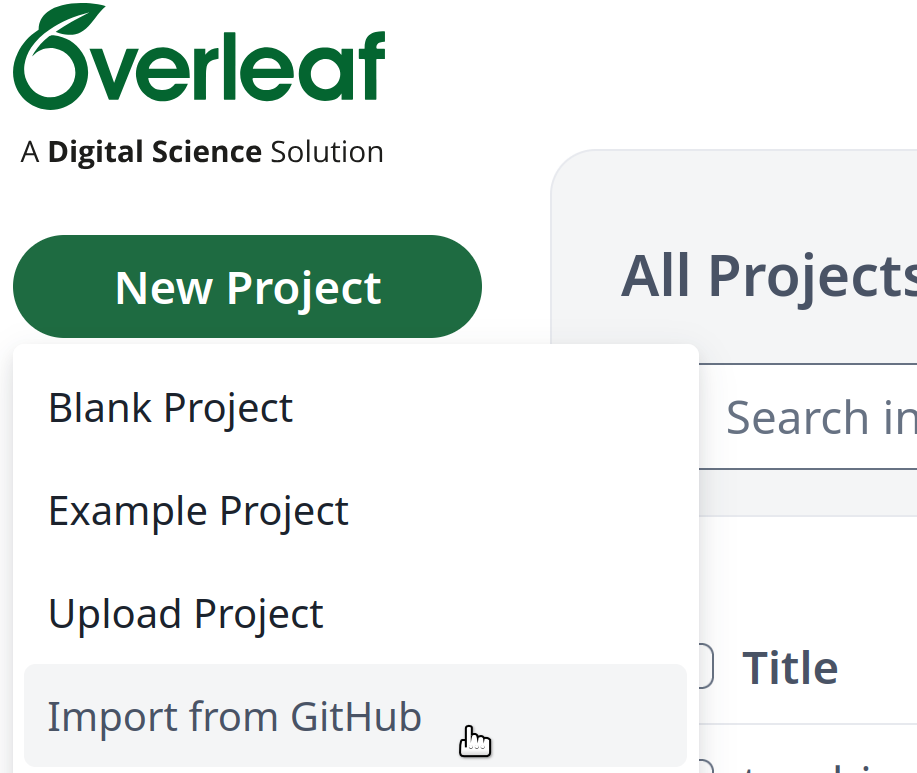
Once this is complete, you should have a new Overleaf project containing the template files.
1.2.3 Step 3: Write your notes in Overleaf and sync with GitHub
Now you can work on your notes just like with any other Overleaf project.
Whenever you want to publish changes to the HTML version, you need to push the changes to your GitHub repository. To do this, in Overleaf, click Menu (top left) and then choose GitHub under the Sync menu.
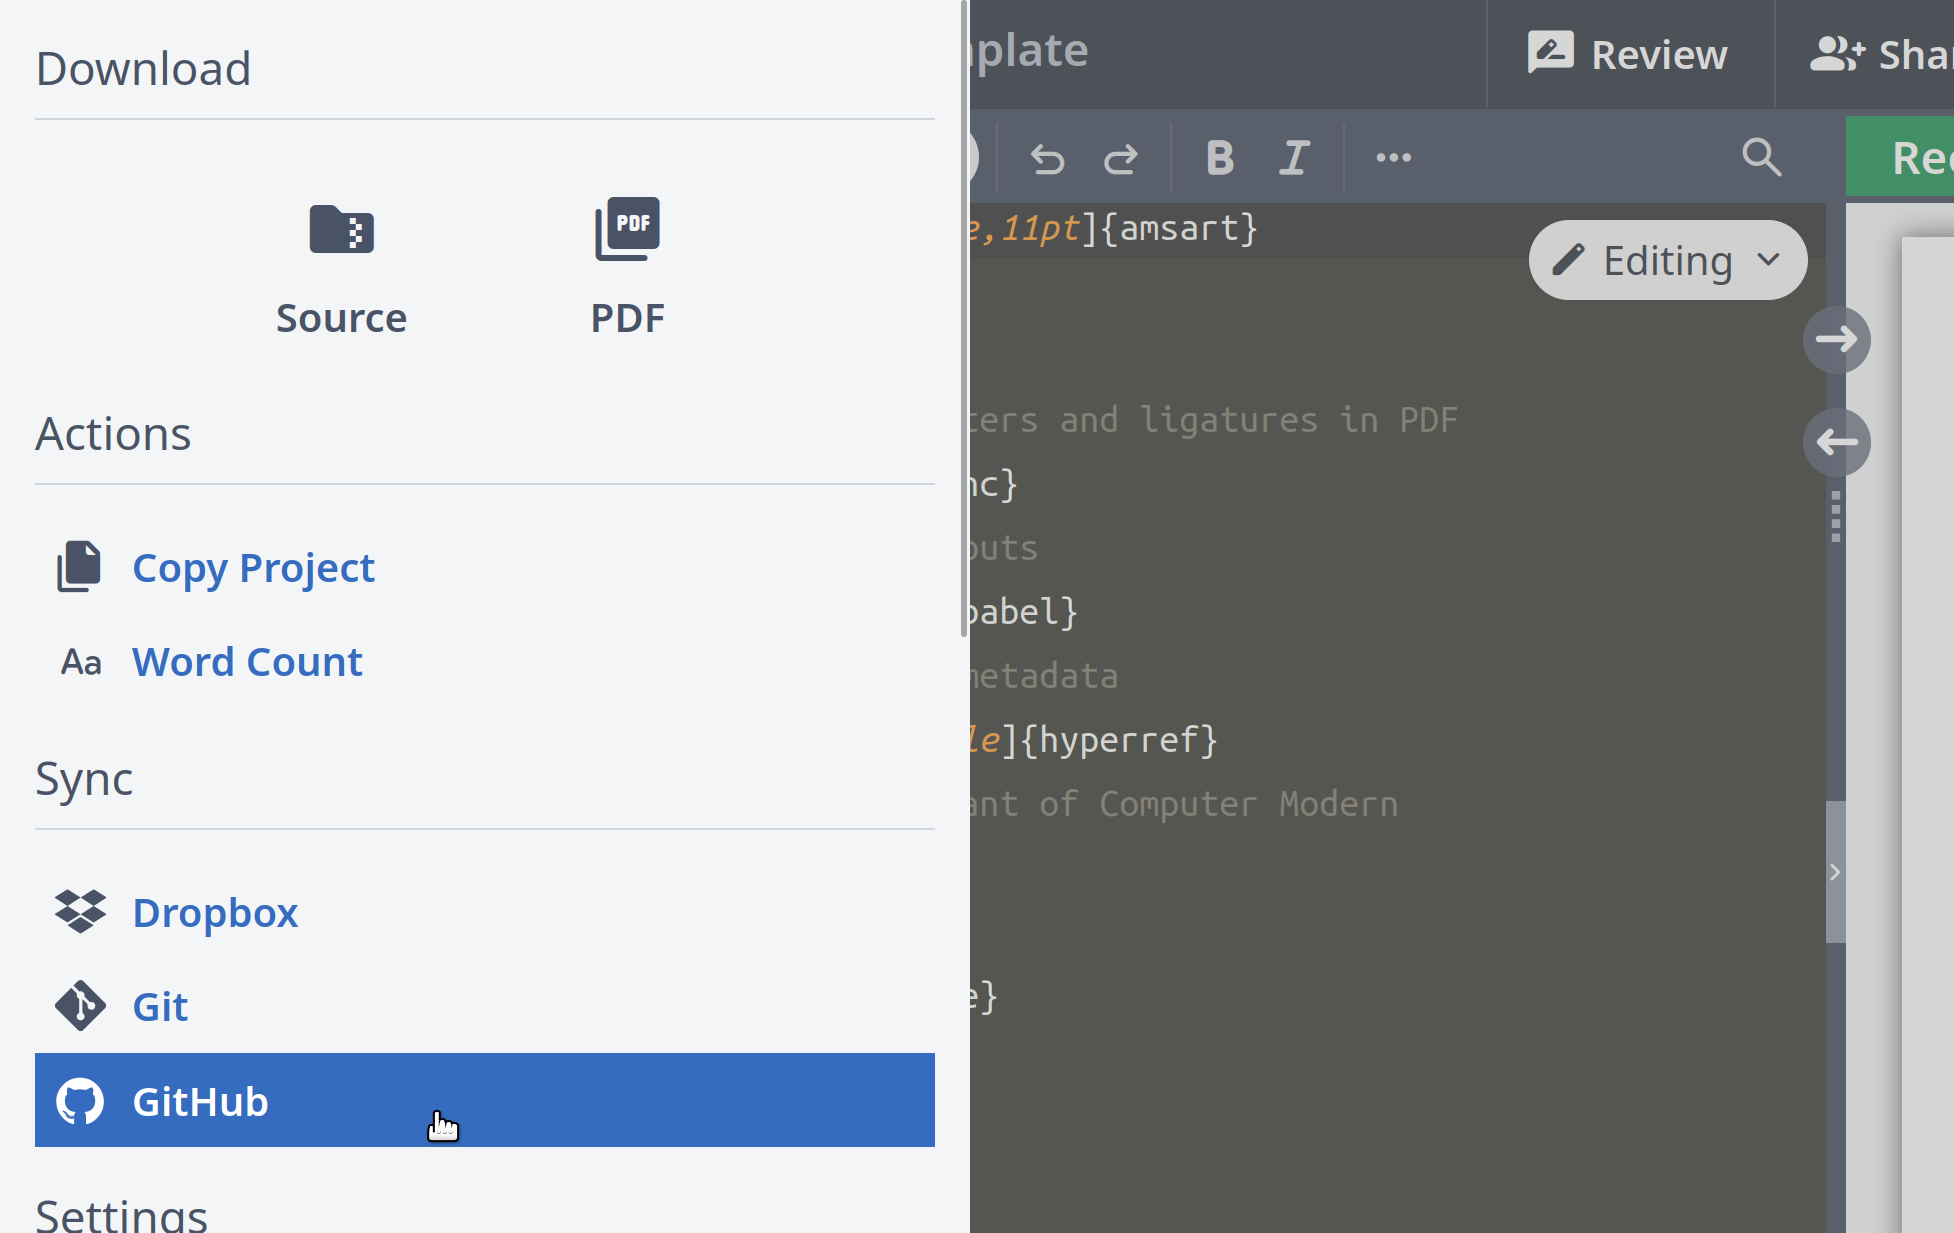
Click Push Overleaf changes to GitHub, enter a description of the changes you have made (optional) and then click Sync.
1.2.4 Step 4: Download the generated HTML version of your notes from GitHub as a SCORM package, and upload it to Learn
Every time you sync new changes to GitHub, the HTML notes will recompile automatically (this takes a few minutes). Visit your GitHub repository; a green check mark above your files indicates that this has completed. Scroll to “Releases” in the right-side menu, and click on the SCORM.main.zip file33 3 The word main may be replaced by the name of any .tex file with documentclass in it. If you have multiple separate documents in your project, you will get multiple SCORM files to upload on Learn separately.. This will download a zip file containing the HTML version of your notes.
Upload the SCORM file
-
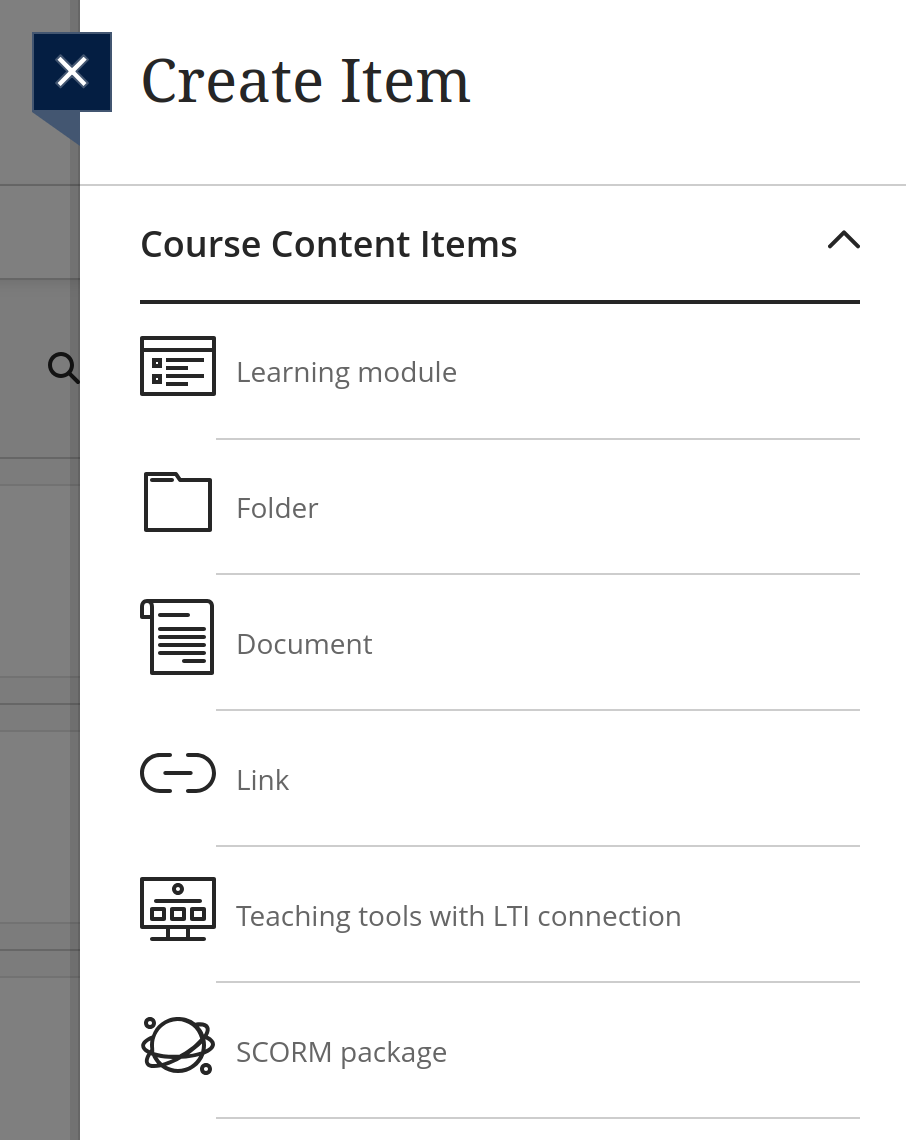
•
On your Learn page, create a new content item.
-
•
Choose the “SCORM package” option.
-
•
Upload the file
SCORM.main.zip. -
•
Once it’s uploaded, untick the “Mark SCORM” checkbox, and click “Save”.
1.2.5 Step 5 (optional): Publish your notes as a public website
Additionally, or alternatively, you can publish your notes as a public website using GitHub Pages. The advantage of doing this, is that this is all already automated; so there is no need for you to manually update your published site every time you update your notes (as you need to do when uploading to Learn). Instead, you can simply add a link to your published website on your Learn page, and this will always point to the most up-to-date version of your notes.
Your site is already built automatically by using the GitHub template, but it’s not published by default. To set up a publicly-accessible website with your HTML notes, first visit your repository on GitHub. In the top menu, click Settings, then Pages in the left menu.
Under Build and deployment, look for the Branch option. From the Select branch option, choose gh-pages and Select folder /docs.

Wait 1 minute then refresh the page. You should now see a link to the publicly-available site hosting your HTML notes. This includes the URL that you should use to share your notes with students.

Behind the scenes, GitHub will now automatically rebuild your HTML notes and update the public website every time you synchronise changes with GitHub. This was a one-time setup; you don’t need to interact directly with GitHub again.
Copyright and license
As per UK law, as explained in University guidance, the University “is the first owner of the rights of any work made in the course of your employment”, and this applies to teaching materials. By default, this is attributed at the bottom of the index page of your published site.
The University also has an Open Educational Resources policy and guidance; we encourage you to consider publishing your course materials as an open educational resource (and change the copyright notice accordingly).